Understanding Bathroom Sink Vent Diagrams

Bathroom sink vent diagrams provide a visual representation of the plumbing system connected to a bathroom sink. They illustrate the layout and connections of pipes, vents, and other components that facilitate the proper drainage of wastewater and prevent sewer gas buildup.
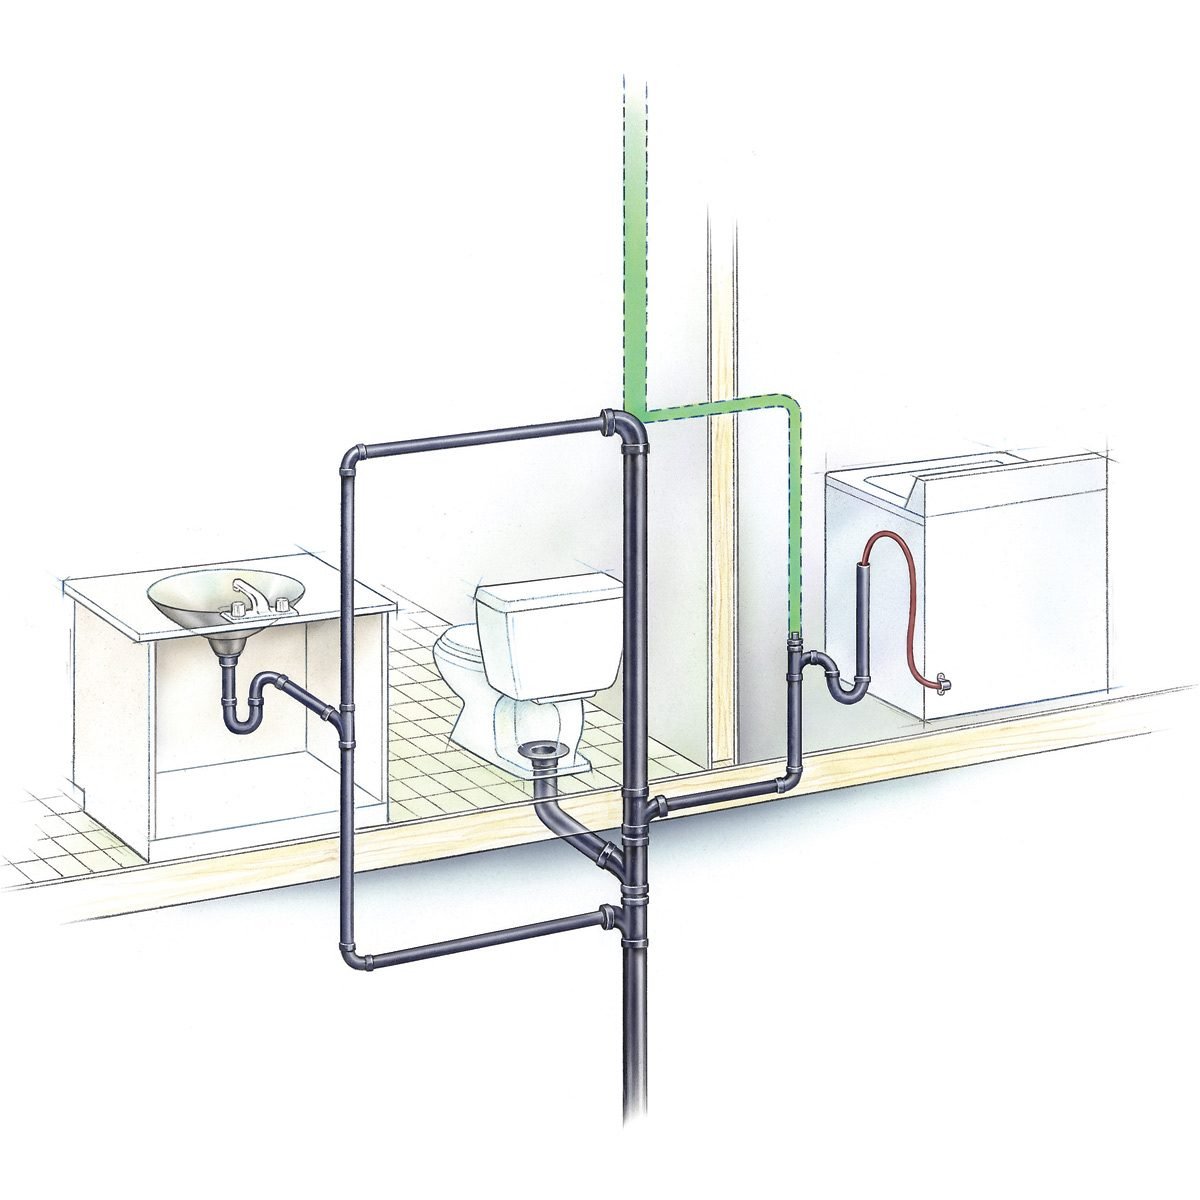
When it comes to plumbing, understanding the layout of your bathroom sink vent diagram is crucial. It provides a clear picture of the pipes and connections involved. However, before you dive into the diagram, it’s essential to ensure proper bathroom sink rough in.
This process involves setting up the necessary pipes and fixtures before installing the sink, ensuring a seamless connection to the vent system. Once the rough in is complete, you can refer back to the vent diagram to understand how the pipes connect to the main vent stack, allowing proper drainage and ventilation for your bathroom sink.
Components of a Bathroom Sink Vent Diagram
- Vent Pipe: A vertical pipe that extends from the drainpipe to the roof, allowing sewer gases to escape and preventing negative pressure from developing in the drainage system.
- Drainpipe: A horizontal pipe that carries wastewater from the sink to the main drain.
- P-Trap: A U-shaped section of pipe located under the sink that traps water to create a barrier against sewer gases.
Importance of Proper Ventilation
Proper ventilation in a bathroom sink drainage system is crucial for preventing the buildup of sewer gas, which can contain harmful bacteria and unpleasant odors. The vent pipe allows sewer gases to escape and prevents negative pressure from forming, which can draw sewer gases back into the bathroom.
Troubleshooting Bathroom Sink Vent Issues: Bathroom Sink Vent Diagram
Bathroom sink vents play a crucial role in maintaining proper drainage and preventing unpleasant odors. However, they can sometimes encounter issues that affect their functionality. Here’s a comprehensive guide to help you identify, troubleshoot, and resolve common bathroom sink vent problems.
Clogged Vents
Clogs are one of the most common causes of bathroom sink vent problems. They can occur due to a buildup of debris, hair, or other materials inside the vent pipe. Symptoms of a clogged vent include slow drainage, gurgling sounds, and foul odors.
- Step 1: Check the Vent Pipe: Inspect the vent pipe for any visible obstructions, such as debris or nests. If you notice any blockages, remove them using a wire hanger or a plumbing snake.
- Step 2: Use a Plunger: Place a plunger over the drain opening and plunge vigorously. This will create a vacuum that can dislodge the clog and restore proper airflow.
- Step 3: Pour Chemical Drain Cleaner: If the clog persists, pour a chemical drain cleaner down the drain according to the manufacturer’s instructions. Be sure to wear gloves and follow all safety precautions.
- Step 4: Call a Plumber: If none of the above methods resolve the clog, it’s advisable to call a professional plumber. They have specialized tools and techniques to remove stubborn clogs and ensure proper vent functionality.
Leaks
Leaks in the bathroom sink vent pipe can also cause problems. They can result from loose connections, damaged pipes, or corrosion. Leaks can lead to water damage, mold growth, and increased water bills.
- Step 1: Identify the Leak: Inspect the vent pipe for any visible leaks or moisture. Check the joints, connections, and the pipe itself for any signs of damage.
- Step 2: Tighten Loose Connections: If you find any loose connections, use a wrench to tighten them securely. Be careful not to overtighten, as this can damage the pipe.
- Step 3: Repair Damaged Pipes: If the pipe is damaged, it may need to be repaired or replaced. For small holes or cracks, you can use a pipe repair clamp or sealant. For more extensive damage, call a plumber.
- Step 4: Prevent Corrosion: To prevent corrosion, apply a protective coating to the vent pipe. You can use a paint or sealant specifically designed for plumbing applications.
Preventing Vent Issues
To prevent future bathroom sink vent issues, it’s important to follow these tips:
- Regularly Clean the Vent: Periodically remove any debris or buildup from the vent pipe using a wire hanger or a plumbing snake.
- Install a Vent Cover: A vent cover can prevent birds, insects, and other animals from nesting inside the vent pipe.
- Use a Hair Catcher: A hair catcher can prevent hair from clogging the drain and potentially blocking the vent.
- Avoid Flushing Inappropriate Items: Never flush non-biodegradable items such as wipes, paper towels, or feminine hygiene products down the drain. These items can clog the vent and cause drainage problems.
Designing and Installing Bathroom Sink Vents

Designing and installing bathroom sink vents is crucial to ensure proper drainage and prevent foul odors. Various vent types are available, each with its advantages and suitability for different bathroom configurations.
Types of Bathroom Sink Vents
- Roof Vents: Installed on the roof, they provide a direct path for vent gases to escape. Ideal for bathrooms with multiple fixtures and long drainpipes.
- Sidewall Vents: Mounted on an exterior wall, they are less conspicuous than roof vents. Suitable for bathrooms with limited attic space or when roof access is difficult.
- Air Admittance Valves (AAVs): Installed under the sink, they allow air to enter the drainpipe when needed, preventing the formation of a vacuum that can slow down drainage. Suitable for bathrooms with short drainpipes or when other vent options are not feasible.
Choosing the Appropriate Vent Type, Bathroom sink vent diagram
The choice of vent type depends on factors such as bathroom layout, fixture count, and available space. For bathrooms with multiple fixtures or long drainpipes, a roof vent is recommended. Sidewall vents are a good option when attic space is limited, while AAVs are suitable for bathrooms with short drainpipes or limited access to the exterior.
Installing a Bathroom Sink Vent
Proper installation of a bathroom sink vent is essential for optimal performance. The vent pipe should be connected to the drainpipe using a sanitary tee fitting and run vertically to the vent stack or roof. The vent pipe should have a minimum diameter of 1-1/2 inches and be sloped downward towards the drain to prevent condensation from accumulating. The vent opening should be protected with a vent cap to prevent debris and pests from entering.
The intricate workings of a bathroom sink vent diagram reveal the hidden paths through which air flows to prevent stagnant water from lingering in the pipes. However, when the delicate balance is disrupted, problems arise. A stuck sink stopper, as described in this comprehensive guide here , can hinder proper drainage, highlighting the crucial role of a well-functioning vent diagram in maintaining a harmonious bathroom ecosystem.
